Saturday, December 15, 2007

A quick holiday dessert!

Simple Charlotte

Photo Sharing and Video Hosting at Photobucket

Adapted from a recipe in Christmas with Southern Living, 1996.

2 (3.4 ounce) boxes of instant vanilla or white chocolate pudding mix
2 cups milk
3/4 cups orange juice
2 tablespoons Triple Sec
1 teaspoon vanilla extract
1 cup whipping cream, whipped
19 ladyfingers, split

Prepare pudding mixes according to directions, using milk and orange juice. Stir in Triple Sec and vanilla. Gently fold in the whipped cream.

Line the bottom and sides of a 9" springform pan with the ladyfingers. Spoon pudding mixture into pan. Cover and chill overnight.

Serves 12.


Sunday, December 9, 2007

Favorite Christmas cookies!

These are my mom's favorite Christmas cookies...

Nutcracker Sweets

(from Southern Living 2002 Annual Recipes)

1 cup butter, softened
1/4 cup granulated sugar
2 cups all-purpose flour
2 cups ground almonds (or use almond flour)
1/4 teaspoon almond extract
1/4 cup maraschino cherries, drained and chopped up
Powdered sugar

Beat butter and sugar at medium speed with an electric mixer until creamy. Add flour, almonds, and extract, beating at low speed until well blended. Stir in cherries. Shape into 1-inch balls. Place on ungreased baking sheet.

Bake at 325 degrees for 18 to 22 minutes or until lightly browned. Cool two minutes. Roll in powdered sugar. Makes about 4 dozen.

Image hosted by Photobucket.com

I always add just a little extra chopped cherries. Yum.

I will post other cookie and some candy recipes later!

Thursday, November 15, 2007

For Thanksgiving...

Here are two recipes I used last Thanksgiving, and will use again!

Cranberry Granitas


Adapted from Giada De Laurentiis from the Food Network

2 cups cranberry juice

1/3 cup sugar

¼ cup lime juice

Fresh cranberries, for garnish

Whisk the cranberry juice and sugar in a heavy medium saucepan over medium heat until the sugar dissolves. Pour the cranberry mixture into a 13 by 9 by 2 inch glass baking dish. Cool completely. Whisk in the lime juice. Freeze until the granita becomes slushy, about two hours. Using fork, stir to blend. Continue freezing the granita until frozen, stirring every hour to form crystals, at least five hours.

Divide the granita into six dessert glasses. Garnish with fresh cranberries, if desired.


Variations: Add 1 shot of Southern Comfort to make a frozen “Scarlett O’Hara”. Or add 1 shot of vodka and ½ shot of Triple Sec to make a frozen “Cosmopolitan”. The original recipe calls for the vodka to be added before freezing, but I prefer to make mine virgin (so the kids can have some!). Ginger ale or any lemon-lime drinks are also good additions.


Pineapple au Gratin


3 cans pineapple chunks, drained, and the juice reserved

1 and a half tablespoons cornstarch

1 cup sugar

2 stacks of Ritz crackers, crushed

1 cup grated cheddar cheese

1 stick of butter, melted


Place pineapple in a buttered casserole dish. Top pineapple with grated cheese. In a saucepan, combine cornstarch, sugar, and juice. Heat until thickened and clear. Pour sauce over pineapple and cheese. Top with Ritz crackers. Drizzle with melted butter. Bake at 350° for 30 minutes or until bubbly and slightly browned.


This is a delicious side dish perfect for any holiday meal, but it goes especially well with a honey-baked ham. Yum!


Enjoy! These aren't just for Thanksgiving. My mom likes to serve the pineapple for Christmas and Easter as well. The pineapple recipe is my aunt's.

Saturday, November 3, 2007

Pumpkins- not just for Halloween!

My mom has had some success in growing pumpkins. These aren't for carving Jack'O Lanterns- they are for eating! Here is a recipe for a casserole that's just divine:

Cinderella’s Coach

1- 1½ pound pumpkin

2 tablespoons fresh lime juice
1 tablespoon soy sauce
2 tablespoons rum (I use Captain Morgan’s Spiced Rum)

1 medium onion, chopped
1 can Ro-Tel (chopped tomatoes and chilies), medium to hot
1 can coconut milk
1 cup uncooked white rice

1 pound raw shrimp, peeled and de-veined

4 tablespoons butter

1. Pre heat oven to 375°.
2. Cut lid off of the pumpkin, and scrape out the seeds and stringy fibers. Scrape some of the pumpkin out of the shell, about one cup, and set aside.
3. Place pumpkin in a large, heavy roasting pan and bake for half an hour, until tender but still firm.
4. Rinse rice, and cook in 2 cups of water (salt to taste) for 20 minutes or until tender. Add one tablespoon of butter. When the water has been absorbed, add coconut milk and set aside.
5. In a small bowl, combine lime juice, rum, and soy sauce. Set aside.
6. In a skillet, melt remaining butter and sauté the onion. Add shrimp, and cook until pink and firm. Stir in the lime juice mixture, and then add the pumpkin, tomatoes and chilies.
7. Add the contents of the skillet to the coconut rice.
8. Fill the pumpkin with the rice mixture.
9. Bake pumpkin for another 15-20 minutes or until the pumpkin is golden brown. Let stand for 15 minutes before serving.

Serves 6-8


I don't know what makes this dish great. The combination of rice, coconut milk, pumpkin, shrimp, and lime juice is very satisfying. All this dish needs on the side is a nice green salad and a loaf of crusty French bread.

Photo Sharing and Video Hosting at Photobucket

This variety of pumpkin is called Long Island Cheese. No, it doesn't taste like cheese- it just looks like a big wheel of cheese!

Wednesday, October 24, 2007

More cookies!

More treats from "I'm Dreaming of a Chocolate Christmas"!


These are "Mocha Madness" cookies.

MOCHA MADNESS COOKIE

2 3/4 cups all-purpose flour
1 teaspoon baking soda
1 teaspoon salt
8 ounces (2 sticks) unsalted butter, cut into 1-tablespoon pieces and softened
1 cup tightly packed dark brown sugar
2 large eggs
3 ounces semisweet baking chocolate, melted
1/4 teaspoon instant espresso powder, dissolved in 2 tablespoons warm water
2 teaspoons pure vanilla extract

8 ounces dark chocolate covered espresso beans, coarsely chopped (1 1/2 cups)

GARNISH

4 ounces semisweet baking chocolate, melted

1. Preheat the oven to 325°F. Line 3 baking sheets with parchment or wax paper.

2. In a sifter, combine the flour, baking soda, and salt.

3. Place the butter and sugar in the bowl of a stand electric mixer fitted with a paddle. Mix on medium for 2 minutes, then stop and scrape down the sides of the bowl and the paddle. Mix again on medium for 2 minutes, then scrape down again. Add the eggs one at a time and mix on medium until incorporated, about 30 seconds. Scrape down again. Add the melted chocolate and beat on medium for 15 seconds, until incorporated.

4. Turn the mixer down to the lowest speed and gradually add the dry ingredients; mix until blended, about 1 minute. Add the espresso and vanilla, and mix on low until thoroughly combined. Add the espresso beans, and use a rubber spatula to finish mixing the ingredients until thoroughly combined.

5. Using 3 slightly heaping tablespoons or 1 level #20 ice-cream scoop, portion 10 or 11 cookies on each baking sheet, spaced about 5 inches apart widthwise and 2 inches apart lengthwise. Place the baking sheets on the top and center racks of the oven, and bake for 12 minutes, switching the sheets between top and center racks and rotating each sheet 180 degrees halfway through the baking.
6. After the cookies have cooled, drizzle each with melted chocolate.

Makes about 32 cookies.

They are to die for! Caution- these are not the type of cookies to eat with milk before bedtime. One or two cookies is almost like a cup of coffee!

Make sure that the espresso beans are chopped well. I didn't chop mine finely enough, and had whole beans in some cookies. They still tasted great, but it's not fun to bite into a hard bean!

Saturday, October 20, 2007

Muffins!!!!

Mom got me yet another new cookbook:


This is the first recipe I tried. It is absolutely divine.

Chocolate Cherry Muffins

MAKES 24 MUFFINS
2 1/2 cups plus 1 tablespoon all-purpose flour
1/2 cup unsweetened cocoa powder
72 cup granulated sugar
11/2 teaspoons baking powder
3/4 teaspoon baking soda
1/2 teaspoon salt
2 cups dried tart red cherries
3/4 cup vegetable oil
4 ounces semisweet baking chocolate, coarsely chopped
1 cup buttermilk
2 large eggs
1/2 cup tightly packed light brown sugar
1/4 cup honey
1 cup semisweet chocolate chips
1/2 cup walnut halves, toasted and coarsely chopped

1. Preheat the oven to 350°F. Line each of the 24 muffin
tin cups with paper liners.

2. In a sifter, combine 2 1/2 cups of the flour, the cocoa, granulated sugar, baking powder, baking soda, and salt. Sift onto a large piece of parchment or wax paper.

3. Place the cherries in a small bowl and dust them with
the remaining tablespoon of flour.

4. Heat the oil and the chopped chocolate in the top of a double boiler or in a medium glass bowl in a microwave oven, and stir until melted
and smooth.

5. Place the buttermilk, melted chocolate, eggs, brown sugar, and honey in a large mixing bowl. Use a whisk to mix until the ingredients are thoroughly combined and
the brown sugar has almost completely dissolved. Add the dry ingredients, and stir with a rubber spatula to combine. Add the cherries, chocolate chips, and walnuts, using the spatula to fold the ingredients together thoroughly.

6. Portion 3 slightly heaping tablespoons or 1 slightly heaping #20 ice-cream scoop of batter into each muffin cup. Place the muffin tins on the top center racks of the oven, and bake until a toothpick inserted in the center of the muffins comes out almost clean, about 16 minutes if you prefer slightly underbaked, and 18 minutes for fully baked. (Switch the tins between top and center and rotate each 180 degrees halfway through the baking time.)

Let them cool for at least 20 minutes so they can be removed from the pan easily. They taste best warm. No need for any butter or jam!


Yum. I left out the walnuts.

This book is great- I've already marked about a dozen recipes from it.

Thursday, October 18, 2007

Baby cakes and brownies!

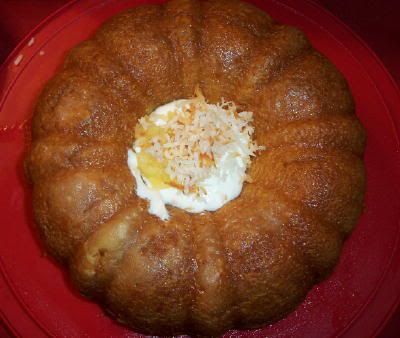
I promised this recipe to some friends. I tried to simplify it a bit from the original found in Death by Chocolate Cakes .


Lemon Poppy Seed Cakelettes with Chocolate Lemon Drop Tops

Cakelettes:

6 ounces (1 ½ sticks) unsalted butter, cut into ½ ounce pieces, plus one tablespoon (melted)
1 cup all-purpose flour
¼ teaspoon baking powder
¾ cup granulated sugar
2 large eggs
1 tablespoon minced lemon zest
1 tablespoon fresh lemon juice
1 tablespoon poppy seeds
½ teaspoon pure vanilla extract

Chocolate Lemon Drop Tops

½ cup powdered sugar
8 ounces cream cheese, cut into 1 ounce pieces
2 tablespoons fresh lemon juice
2 tablespoons minced lemon zest
4 ounces semisweet baking chocolate, coarsely chopped and melted

Make the cakelettes:

1. Pre-heat oven to 325°. Use the melted butter to lightly coat the bottoms and sides of two 12 cup nonstick miniature muffin tins.

2. Sift together the flour and baking powder and set aside.

3.Place butter and sugar in a mixing bowl with a paddle. Mix on low speed for 1 minute, then medium speed until soft. Scrape down the sides of the bowl. Beat an additional 3 minutes until very soft. Add eggs, one at a time, until mixed. Scrape down the bowl with each added egg.

4. Operate mixer on low while gradually mixing in the dry ingredients. Mix until incorporated, about 45 seconds. Add lemon zest, lemon juice, poppy seeds, and vanilla and mix on low speed for 15 seconds. Scrape down the sides of the bowl. Mix for an additional 30 seconds on medium.

5. Place two level tablespoons of the batter into each miniature muffin tin. Place tins on the middle rack of the oven. Bake for 18 to 20 minutes or until a toothpick inserted into a cake comes out clean. Cool for 10 minutes, then remove cakelettes from tins.

Make the chocolate lemon drop tops:

1. Sift and set aside the powdered sugar.

2. Place the cream cheese, lemon juice, and zest in an electric mixing bowl with a paddle. Mix on low speed for 1 minute, then on medium for 2 minutes until soft. Scrape down the sides of the bowl. Operate the mixer on low while gradually adding the melted chocolate. Beat on medium for 45 seconds.

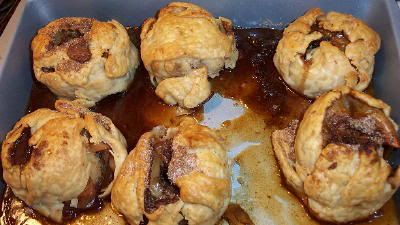
3. Transfer the icing to a pastry bag fitted with a small straight tip. Pipe several “drops” of the icing onto each cakelette. Refrigerate until ready to serve.

Makes 24 cakelettes

Photo Sharing and Video Hosting at Photobucket

Photo Sharing and Video Hosting at Photobucket

Mine turned out a little bigger than they were supposed to be. I used regular muffin tins, so there were only 12 cakelettes!

My mom bought me a new book, 
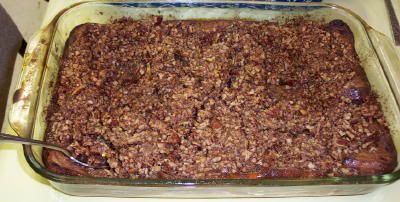
Presidential Cookies . (my version is the newest one, not yet available through amazon.com!) It's a great book filled with historical tidbits about the Presidents and First Ladies of the United States. There are many good recipes, some well known, some unusual. I tried a "brownie" made during the James Madison presidency:
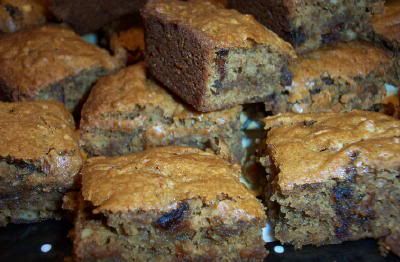
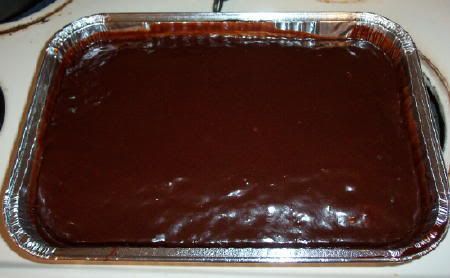
Apple Date Nut Brownies

1-POUND BOX DARK BROWN SUGAR
3/4 CUP BUTTER (1 1/2 STICKS)
2 EGGS
2 TBSP, VANILLA
2 MEDIUM COOKING APPLES, PEELED, CORED, AND CHOPPED
2 1/2 CUPS ALL-PURPOSE FLOUR
2 TSP. BAKING POWDER
1/2 TSP. SALT
1/2 CUP CHOPPED PECANS
1/2 CUP CHOPPED DATES

1. Preheat oven to 350 °
2. Combine sugar and butter in a large saucepan.
3. Cook over low heat, stirring constantly until sugar dissolves.
4. Remove saucepan from heat and cool to room temperature.
5. Beat in eggs and add vanilla.
6. In a small bowl, toss apples with 1/4 cup of the flour and set aside.
7. Add remaining 2 1/4 cups flour, baking powder, and salt to sugar mixture and mix well.
8. Fold in apples, pecans, and dates.
9. Pour into a greased 15 x 10 x 1-inch jelly-roll pan.
10. Bake for 35 minutes or until a toothpick stuck in the center comes out clean.
11. Cool completely before cutting into squares.
YIELD: 2 TO 3 DOZEN BROWNIES.

Photo Sharing and Video Hosting at Photobucket

Tuesday, October 16, 2007

Squash!

Another sure sign of autumn- the abundance of squash in farmers markets and grocery stores. This isn't really a recipe- just an idea of what to do with yummy squash.

This variety is called sweet dumpling:

Photo Sharing and Video Hosting at Photobucket

I stuffed it with a creamy mushroom and Italian sausage risotto:

Photo Sharing and Video Hosting at Photobucket

The basic cooking technique: Preheat the oven to 350°. Carefully cut the top of the squash off and set aside. Scoop out the seeds and discard. Scoop out some of the flesh and set aside (to add to filling). Bake the squash for 45 minutes or until tender. Let cool, and then fill with any kind of rice or pasta you like, and bake until hot.

Any squash will do. The dumpling squash is especially sweet.

Saturday, October 6, 2007

A snack for halftime!

Deviled Nuts

From The Ultimate Southern Living Cookbook

This is a real crowd pleaser. I always add just a little more hot sauce and Worcestershire sauce.

1 pound pecan halves
1/3 cup butter
2 teaspoons hot sauce such as Tabasco
2 teaspoons Worcestershire sauce
¾ teaspoon salt
¼ teaspoon dry mustard
¼ teaspoon dried pepper flakes

Combine ingredients, toss with pecans, Spread pecans on an ungreased baking pan, bake at 325 degrees for twenty minutes. Cool completely and store in an airtight container. Yields 4 ½ cups.


This is great for game day nibbles or to serve with pre-dinner cocktails. You can use just about any type of nut or a combination of nuts!

Thursday, September 20, 2007

For friends who asked...

The Pina Colada Cake.

Pina Colada Cake
Serves 16

CAKE AND SYRUP:

Vegetable oil spray for misting the pan
Flour for dusting the pan
1 can (15 ounces) cream of coconut
1 package (18.25 ounces) plain yellow cake mix
1 package (3.4 ounces) vanilla instant pudding mix
1/2 cup plus 2 tablespoons light rum
1/3 cup vegetable oil, such as canola, corn, safflower, soybean, or sunflower
4 large eggs
1 can (8 ounces) crushed pineapple packed in juice, drained
1 cup frozen unsweetened grated coconut, thawed

WHIPPED CREAM:

1 cup heavy (whipping) cream
1 can (8. 5 ounces) cream of coconut

1. Place rack in the center of the oven. Preheat the oven to 350°F. Lightly mist a 12-cup Bundt pan with vegetable oil spray, then dust with flour. Shake out excess flour. Set the pan aside.

2. Stir the cream seam of coconut, then pour 1/2 cup into a liquid measuring cup and reserve the remaining 1 cup for the syrup.

3. Place the cake mix, pudding mix, 1/2 cup of coconut, ½ cup rum, oil, and eggs in large mixing bowl. Blend with an electric mixer on low speed for 1 minute. Stop the machine and scrape down the sides of the mixing bowl with a rubber spatula. Increase mixer speed to medium and beat for 2 minutes more, scraping the sides down as needed. The batter should look thick and smooth. Fold in the crushed pineapple until it is well distributed in the batter. Pour the batter into prepared pan, smoothing it out with the spatula. Place the pan in the oven.

4. Bake the cake until it springs back when lightly pressed with your finger and just starts to pull away from the sides of the pan. 50 to 55 minutes. Remove the pan from oven and place it on a wire rack to cool for 20 minutes. Place the coconut in an aluminum pie pan and toast it in the oven until lightly browned, 4 to 5 minutes. Remove the pan and set aside. Run a long, sharp knife around the edge of the cake and invert it onto a serving platter.

5. Prepare the rum syrup. Place the reserved l cup cream of coconut and the remaining 2 tablespoons rum in a small mixing bowl. Stir until well combined.

6. While the cake is still warm, poke holes in the top with a long wooden skewer or toothpick. Spoon the rum syrup over the top, allowing it to seep into the holes and drizzle down the sides and into the center of the cake. Let the cake cool completely, 30 minutes.

7. For the coconut whipped cream, place the heavy cream and cream of coconut in a large mixing bowl. Beat with an electric mixer on high speed until stiff peaks form, 2 to 3 minutes.

8. Slice and serve the cake topped with coconut whipped cream and garnished with the toasted coconut.

Photo Sharing and Video Hosting at Photobucket

This cake is always popular at parties and family gatherings. I usually don't have leftovers, but the cake will keep for a couple of days.

It came from The Cake Mix Doctor . I've made probably half of the cakes in the book!

Tuesday, September 18, 2007

Fall= apple treats!

Apple dumplings:

6 medium sized apples, washed and cored

1 package pie crust (2 crusts)

1/2 cup dark brown sugar
1 teaspoon ground cinnamon
4 tablespoons unsalted butter

12 caramels

Preheat oven to 375°. Divide pie crusts into six pieces. Mix together the sugar, cinnamon, and butter. Fill each apple with the mixture and two caramels. Wrap each apple in pie crust. Place apples on greased baking tray. Bake for 1 hour, or until pastry is browned. Serve with ice cream if desired.

Photo Sharing and Video Hosting at Photobucket

Tuesday, September 11, 2007

Pesto presto!

My favorite pasta topping is probably pesto. I make mine with fresh basil from my mom's garden!

Basic Basil Pesto (my own recipe)

This is always a favorite in my family, and easy to make.

1 cup packed fresh basil
¼ cup pine nuts, lightly toasted
2 large cloves of garlic
½ cup olive oil (or more, depending on how much moisture is wanted)
½-¾ cup freshly grated parmesan cheese

Coarsely chop all ingredients in a food processor. Add salt to taste- unless you use a salty cheese. Toss with favorite cooked pasta.

I like to toast the garlic along with the pine nuts. It makes the garlic flavor a little less intense.

I also add a couple of tablespoons of cream to the pasta as I toss it with the pesto, which gives it a creamier texture. My favorite pasta to use is penne. The pesto sticks to it well, so every bite is full of the sauce.

Wednesday, September 5, 2007

Another older recipe...

Dirty Risotto

From Giada’s Family Dinners

4 to 6 servings

5 cups reduced sodium chicken broth
2 tablespoons unsalted butter
2 ounces pancetta, chopped (I don’t like pancetta, so I skip this ingredient)
6 ounces spicy Italian sausage, casings removed
¾ cup finely chopped onion
1 cup chopped red bell pepper (I use half that. It’s a matter of taste.)
4 ounces button mushrooms, trimmed and coarsely chopped
1 ½ cups arborio rice (no substitutions!)
¾ cups dry white wine
½ cup freshly grated parmesan cheese
¼ teaspoon freshly ground black pepper
1 tablespoon chopped fresh parsely

Bring broth to a simmer in a medium saucepan. Cover the broth and keep hot over low heat.

In a large heavy saucepan, melt the butter over medium heat. Add the meats and sauté until golden brown, about five minutes. Add the onion, bell pepper, and mushrooms, and sauté until tender, about 8 minutes, scraping up the browned bits on the bottom of the pan. Add the rice and stir to coat with the oil. Add the wine and simmer until the wine has almost completely absorbed, about 2 minutes. Continue cooking the rice, adding the broth ½ cup at a time, stirring constantly and allowing each addition of broth to absorb before adding the next, until the rice is tender but still firm to the bite and the mixture is creamy, about 25 minutes. Remove from the heat. Stir in the cheese, salt, and pepper. Transfer to a serving bowl. Sprinkle with parsley if desired and serve immediately.

This is not a quick recipe. But it is a very satisfying side dish. Enjoy!


I really enjoy watching Giada's progam on The Food Network. Her books are terrific, too. This book is one of my favorites.

Sunday, August 19, 2007

Some older recipes...

...that I had on my other blog. I'm moving all of my recipes here and taking them out of Stitches in Time.

Here we go-

I made this for a Derby party. It's Benedictine spread, and it's a very refreshing treat.

Adapted from Joy of Cooking , the latest edition. I changed a few things based on family recipes.

The basic recipe (can be doubled):

1 medium cucumber, peeled, seeded, and grated; and 1/2 medium onion, chopped. Squeeze out the excess water. (this is very important! You don't want the spread to be too wet.) Put in a food processor with 8 ounces of softened cream cheese. Blend until fluffy. Salt to taste. I add two tablespoons of mayonnaise to make it smoother. Some recipes call for sour cream instead.

Joy of Cooking suggests using a dab of green food coloring to give the spread its trademark color, but it's also a good idea to use finely chopped parsley or frozen spinach (about one tablespoon of either). The color is more natural and adds a little flavor.

Serve on thin sandwich bread or crackers. A little bacon with the spread makes a very good sandwich!

Named for Jennie Benedict, a Louisville, KY caterer who first made it back in the early 20th Century. It is a traditional tea sandwich for Kentucky Derby parties as well as wedding receptions. There's an old joke that a Louisville bride isn't properly married unless Benedictine sandwiches have been served at her reception! My mom, aunts, and sister all had them for their weddings. It's perfect for summer.

Make some mint juleps and enjoy these while watching the Derby!


From this book:
The Cake Mix Doctor


Chocolate Cherry Cake


Serves 20
Prep time: 7 minutes
Bake time: 30 to 35 minutes
Assembly time: 10 minutes

Cake:

Vegetable oil spray for misting the pan
1 package devil’s food cake mix, with or without pudding mix.
1 can (21 ounces) cherry pie filling
2 large eggs
1 teaspoon almond extract (vanilla will do in a pinch)

Chocolate Glaze:

1 cup sugar
1/3 cup butter
1/3 cup whole milk
1 cup semi sweet chocolate chips

1. Preheat oven to 350°. Lightly mist 13 by 9 inch cake pan with spray.

2. Place the cake mix, pie filling, eggs, and extract into large mixing bowl. Blend with an electric mixer at low speed for 1 minute. Stop mixer and scrape down the sides of the bowl. Increase mixer speed to medium and beat until well blended. The batter should look thick. Pour batter into the cake pan and smooth the top with a rubber spatula.

3. Bake the cake at 350° for 30 to 35 minutes, or until the cake starts to pull away from the pan. Remove the cake from the oven and cool slightly while preparing the glaze.

4. Prepare the glaze- cook sugar, butter, and milk over medium heat until the mixture comes to a boil. Boil, stirring constantly, for 1 minute. Remove pan from the heat and blend in chocolate until melted. When the glaze is smooth, pour over the still warm cake so it covers the entire surface. Cool for 20 minutes before serving. This cake will stay fresh for several days.

Photo Sharing and Video Hosting at Photobucket

This cake is a huge crowd pleaser. It is one of the easiest cakes to do, probably the easiest in that book! I've made it for parties and it was always a hit...never any leftovers.

Praline French Toast Casserole

From Paula Deen and Friends

Serves 8

8 eggs
1 ½ cups half-and-half
1/3 cup maple syrup
1/3 cup packed light brown sugar
10 to 12 slices soft bread, 1 inch thick (I use cinnamon raisin. Paula probably uses plain old white bread!)

Topping:

½ cup (1 stick) butter
½ cup packed light brown sugar
2/3 cup maple syrup
2 cups chopped pecans

1. Generously butter a 13-by-9 inch casserole dish.
2. Mix the eggs, half-and-half, maple syrup, and sugar in a large bowl. Place the bread slices in the dish and cover with the egg mixture. Cover dish with plastic wrap and soak overnight in the refrigerator.
3. Preheat the oven to 350°. Remove the casserole from the refrigerator.
4. Make the topping: Melt butter in a saucepan. Add sugar and maple syrup and cook for 1 to 2 minutes. Stir in the pecans. Pour the mixture over the bread and bake for 45 to 55 minutes. Allow to sit for ten minutes before serving.

Photo Sharing and Video Hosting at Photobucket

That's it for now. I have a ton of other recipes to share.

Thursday, August 16, 2007

Got extra chili peppers?

This is a recipe I sort of made up (loosely based on something I read in a magazine) after my mother's garden produced mass quantities of chilis.

Chili Relenos

1 package of egg roll wrappers (about 20 pieces)
20 medium sized Anaheim chili peppers
1-1/2 cups shredded cheese such as Cheddar Jack
Oil for frying
Chili sauce or salsa for dipping

Cut off the tops of the chilis and carefully remove seeds. Roast the chilis in the oven at 350° F for about 20 minutes or until tender. Let cool.

Stuff the chilis with cheese, then wrap each chili in an egg roll wrapper.

Heat enough oil to cover wrappers to 375° F, then fry chilis until the wrappers are crispy. Keep warm in the oven until all chilis are fried.

Serve with Sweet chili sauce or your favorite salsa.


Photo Sharing and Video Hosting at Photobucket

Chili relenos are usually made with poblano chilis, but the Anaheims work best with the egg roll wrappers. This dish is a big hit with my family.

Starting a whole new blog...

...because I have so many recipes to share! They won't all fit in my stitching/book/movie review blog anymore!

I'll begin with a favorite recipe:

From this cookbook: The Lady and Sons

Many, many wonderful desserts, easy to follow directions. And in some cases, the stories behind their creation. It's hard to resist a dessert called "Not yo mama's banana pudding"! And some sound weird but no doubt taste marvelous- Key Lime Grits Pie, for one.

This one has proven to be very popular with family and friends:


Cassata Cake


Paula says: “This Italian dessert tastes something like a cake version of a cannoli.”

2 pounds ricotta cheese
1 ½ cups confectioner’s sugar
1 teaspoon pure vanilla extract
¼ cup white crème de cacao
¼ cup minature semi sweet chocolate chips
2 ½ dozen ladyfingers, split
1 ½ cups heavy whipping cream
1/3 cup granulated sugar.
Maraschino cherries and walnuts or pecans, for decorating the cake.

Beat cheese, sugar, vanilla, and crème in an electric mixer on medium speed for about ten minutes. Stir in chocolate chips. Line bottom and sides of a springform pan with ladyfingers. Fill pan with cheese mixture, chill overnight. When ready to serve, whip cream and granulated sugar until stiff peaks form. Frost the top of cake and garnish with cherries and nuts.

I changed a couple of things here, too. I like maraschino cherries, so I added some chopped cherries and pecans to the cheese mixture. I also didn’t beat it quite as long as ten minutes. The texture was more like a cannoli filling that way. Finally, I added a teaspoon of crème de cacao to the whipped cream topping. Yum.

Serves ten.

What it looks like:
Photobucket - Video and Image Hosting Photobucket - Video and Image Hosting


More to come!